|

Previous topic: Why use HDR, and what does HDR mean anyway?
If you're planning to use HDR, it's worth testing every part of the process before you actually go out and shoot anything important. When you've read all the recommendations try just walking out into the street and taking a set of shots. Your first HDR may not turn out well, so it's vital to practice before you need to shoot in earnest.
Any set of two or more differently exposured shots of the same scene will do in a pinch. True HDR usually requires a minimum of two images; although you can create pseudo-HDR images from a single RAW file.
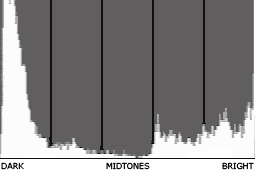
Use the histogram view on your camera, if available, to check that the darkest frame isn't touching the right hand edge of the histogram. Also check that the brightest frame isn't touching the left hand edge of the histogram. Your aim is to have the *entire* range of brightnesses in the scene covered by the images you take. If you don't have the complete range covered, keep shooting and adjusting until you do.

|
Use manual focus if possible. If auto focus is enabled, the camera may change the focus between shots, and major focussing differences are impossible to correct later. By all means set the shot up initially with auto focus, but I suggest you switch to manual focus when you're ready to shoot your bracket set.
Use Aperture priority mode if possible. Aperture priority is available on almost all dSLRs, and some compact cameras too. It will be denoted by an A or Av on the mode dial of your camera. If the aperture setting shifts between exposures you may find different amounts of the image are in focus in the different frames, which may make the resulting HDR look slightly strange. For web size images this may not be a problem, but for large size prints significant aperture values are nigh on impossible to fix in post processing.
If you can, shoot in RAW mode; if it's practical to do so with your camera. RAW mode allows you to capture slightly more dynamic range per shot when compared with JPEG, which means you'll get better results with RAW from the same number of shots. It's not impossible to shoot good HDR with JPEG, but the final image quality will almost always be better if you shoot RAW.
Use Auto Exposure Bracketing if available. This will automate the shooting process, but you ideally need a minimum range of three images +/- 2 stops and as metered. So one shot will be -2EV, one 0EV, and the other +2EV. If you have moving objects you may need to think about the shooting order, if you have any control over it.
Shoot in continuous/burst mode if available. This usually means the images will be closer to the same time, which means fewer alignment issues with moving objects, and less likelihood of camera shake/motion caused by pressing the button repeatedly.
Use a tripod. Using a tripod should mean that the differently exposed images will align correctly. Photomatix, my preferred HDR merging software, will correct misalignment up to a point, but it's easier and the results will be slightly better if you don't have to. That said, you can usually correct the alignment later with additional software, so for non-critical work I tend to shoot handheld.
Be careful of moving objects. If there are people in your shot, if possible wait until they stop moving, or have left the frame. Photomatix has options for removing ghost images (people or ripples), and you can manually fix things manually later in Photoshop, but a stable scene is easiest to work. Fast moving objects can be a problem, as they may appear on one image and not in another.
